I’ve been making this easy gluten‑free bread for years and it consistently delivers a soft, sliceable loaf that’s great for sandwiches or toast. What makes it special is the balance of a reliable gluten‑free flour blend with a little psyllium or xanthan to create structure and chew. If you’re exploring more gluten‑free bread recipes, I often point readers to helpful resources like gluten-free bread recipes while you get comfortable with the technique.
Why Make This Recipe
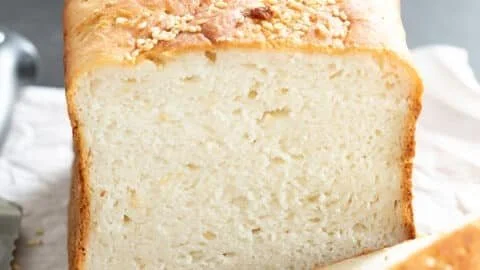
- It produces a tender, moist crumb that slices without crumbling — perfect for sandwiches, toast, and grilled cheese.
- The loaf uses pantry-friendly ingredients and takes about 2 hours from start to finish, making it convenient for weeknight baking.
- It’s adaptable: swap seeds, herbs, or sweeteners and you’ll have a new loaf every time. For technique help, see this guide to baking basics and techniques.
- It’s a forgiving recipe for bakers new to gluten‑free flours because the psyllium or xanthan gives predictable rise and texture.
- Personal insight: I love this bread because it made me stop buying sliced loaves — the freshness, aroma, and warm butter on a homemade slice are unbeatable.
Recipe Overview
- Prep time: 20 minutes (active)
- Proofing time: 45–60 minutes
- Cook time: 35–45 minutes at 375°F (190°C)
- Total time: ~1 hour 45 minutes
- Servings: 10–12 slices (1 standard 9×5-inch loaf)
- Difficulty: Easy–Medium
- Method: Mix dry ingredients, bloom yeast in warm liquid (105–115°F / 40–46°C), combine wet and dry, rapid proof in a warm spot, bake in a greased 9×5-inch pan until internal temperature reaches 200–205°F (93–96°C).
My Experience Making This Recipe
The first few times I tweaked flour ratios and hydration to avoid a gummy center; adding 1 tablespoon psyllium husk (or 1 teaspoon xanthan gum if your blend lacks it) gave consistent structure. I also learned that proofing in a slightly warm oven (off, with just the light on) speeds rise without overheating the dough.
How to Make Gluten Free Bread Recipe
This loaf is a yeast‑leavened quick-rise bread — you bloom the yeast in warm water with a little sugar, whisk the dry blend (gluten‑free flour, salt, and binder), then beat in eggs, oil, and the yeast mixture. Key techniques include hydrating psyllium or xanthan thoroughly so it forms a gel, using a stand mixer or vigorous hand beat to incorporate air, and tapping the pan to remove large air pockets before baking. Expect a wet, batter‑like dough rather than a traditional elastic dough.
Expert Tips for Success
- Measure by weight when possible: 1 cup gluten‑free blend ≈ 120–140 g depending on blend; a kitchen scale improves consistency.
- Water temperature matters: keep liquid at 105–115°F (40–46°C) to activate yeast without killing it. Use an instant‑read thermometer if you’re unsure.
- Use psyllium husk powder (1 tbsp) for a more elastic crumb; if you use xanthan gum substitute 1 tsp only if the blend has none.
- Preheat the oven fully to 375°F (190°C) and bake until an instant‑read thermometer reads 200–205°F (93–96°C) at the loaf center for a reliably baked crumb. For creative shapes and crusts, explore techniques from specialty artisan breads.
How to Serve Gluten Free Bread Recipe
- Toast thick slices and top with mashed avocado, flaky salt, and lemon for a fast breakfast.
- Use as sandwich bread — it holds up well to heavier fillings like tuna or roasted vegetables.
- Serve slightly warmed with butter and jam for brunch.
- For presentation, brush the top with melted butter and scatter seeds (sesame, poppy, or sunflower) before baking for an attractive crust.
Storage and Reheating Guide
Store cooled whole loaves wrapped tightly in plastic wrap or a sealed container at room temperature for up to 3 days. For longer storage, slice and freeze in a zip‑top bag for up to 3 months; separate slices with parchment to avoid sticking. Reheat frozen slices in a toaster or oven at 350°F (175°C) for 6–10 minutes; for a whole frozen loaf, thaw overnight in the fridge then refresh at 300°F (150°C) for 10–15 minutes.
Recipe Variations
- Dairy‑free: replace milk with water or unsweetened almond milk and use oil instead of butter.
- Seeded whole‑grain: substitute up to 25% of the blend with sorghum or millet flour and add 1/2 cup mixed seeds for texture.
- Sweet breakfast loaf: fold in 1/3 cup brown sugar, 1 tsp cinnamon, and 1/2 cup raisins — a nod to sweet breads and breakfast.
- Egg‑free/Vegan: use a commercial egg replacer (follow package) or a blend of 1/4 cup aquafaba + 2 tbsp ground flax + extra 2–3 tbsp water to help with binding.
Nutritional Highlights
- Gluten‑free bread can be lower in fiber if made solely from refined rice flour; add psyllium, seeds, or whole‑grain flours to boost fiber.
- Using olive oil and eggs increases healthy fats and protein versus purely starch‑based loaves.
- Allergen note: this recipe commonly contains eggs and may contain dairy and soy depending on flour blend — always check labels and substitute as needed. Aim for 1–2 slices per serving depending on energy needs.
Troubleshooting Common Issues
- Dense or gummy center: increase bake time and check internal temp reaches 200–205°F (93–96°C); also ensure psyllium is fully hydrated and you didn’t underbake.
- Loaf collapses after rising: overproofing or too-warm proofing can cause collapse; proof in a 75–80°F (24–27°C) spot and don’t exceed about 60 minutes for the final rise.
- Crumb falls apart when slicing: let the loaf cool completely (at least 1 hour) before slicing; chilling briefly firms the crumb and makes neat slices easier.
Frequently Asked Questions
Q: Can I use just one gluten‑free flour (like rice flour) for this loaf?
A: Using a single flour typically yields a crumb that’s either too gritty or too dense. A blend with rice flour, tapioca or potato starch, and sorghum or buckwheat offers a better balance. If you must use one flour, combine it with xanthan or psyllium and expect textural differences.
Q: Do I need psyllium husk or xanthan gum?
A: Yes — one of those binders is important for elasticity and to trap gas from the yeast. Psyllium (1 tbsp) gives a softer, more elastic crumb; xanthan (about 1 tsp) works well if your flour blend is otherwise low in structure.
Q: How can I tell when the bread is fully baked?
A: The most reliable method is an instant‑read thermometer in the center reading 200–205°F (93–96°C). Also look for a deep golden crust and a hollow sound when you tap the bottom.
Q: Can I make this in a bread machine?
A: Some machines handle wet, gluten‑free batters, but you’ll likely need a paddle instead of a kneading blade and a short knead cycle. Check your machine’s manual for gluten‑free settings and expect to experiment with timing.
Conclusion
If you want a simple, dependable loaf to build confidence with gluten‑free baking, try the recipe approach described here and compare techniques with the excellent “Easy Gluten‑Free Bread” method at Easy Gluten‑Free Bread – Mama Knows Gluten Free (https://www.mamaknowsglutenfree.com/easy-gluten-free-bread/).
Print
Easy Gluten-Free Bread
A soft, sliceable gluten-free bread perfect for sandwiches and toast, using pantry-friendly ingredients.
- Total Time: 100 minutes
- Yield: 10-12 slices (1 standard 9×5-inch loaf) 1x
Ingredients
- 1 ½ cups gluten-free flour blend
- 1 tablespoon psyllium husk or 1 teaspoon xanthan gum
- 1 teaspoon salt
- 1 tablespoon sugar
- 1 packet (2 ¼ teaspoons) instant yeast
- 1 cup warm water (105-115°F / 40-46°C)
- 2 large eggs
- 2 tablespoons olive oil
Instructions
- Preheat the oven to 375°F (190°C).
- In a bowl, combine the gluten-free flour blend, psyllium husk (or xanthan gum), salt, and sugar.
- In a separate bowl, bloom the yeast in warm water for about 5 minutes.
- Beat in the eggs and olive oil to the yeast mixture.
- Combine wet and dry ingredients until well mixed, forming a batter-like dough.
- Let the dough sit in a warm area for 45-60 minutes to proof.
- Pour the dough into a greased 9×5-inch loaf pan.
- Bake for 35-45 minutes, until the internal temperature reaches 200-205°F (93-96°C).
- Allow to cool completely before slicing.
Notes
For different variations, you can add seeds or herbs to the dough or use a different flour blend for a new flavor.
- Prep Time: 20 minutes
- Cook Time: 40 minutes
- Category: Bread
- Method: Baking
- Cuisine: Gluten-Free
- Diet: Gluten-Free
Nutrition
- Serving Size: 1 slice
- Calories: 160
- Sugar: 1g
- Sodium: 230mg
- Fat: 5g
- Saturated Fat: 1g
- Unsaturated Fat: 4g
- Trans Fat: 0g
- Carbohydrates: 27g
- Fiber: 3g
- Protein: 5g
- Cholesterol: 35mg