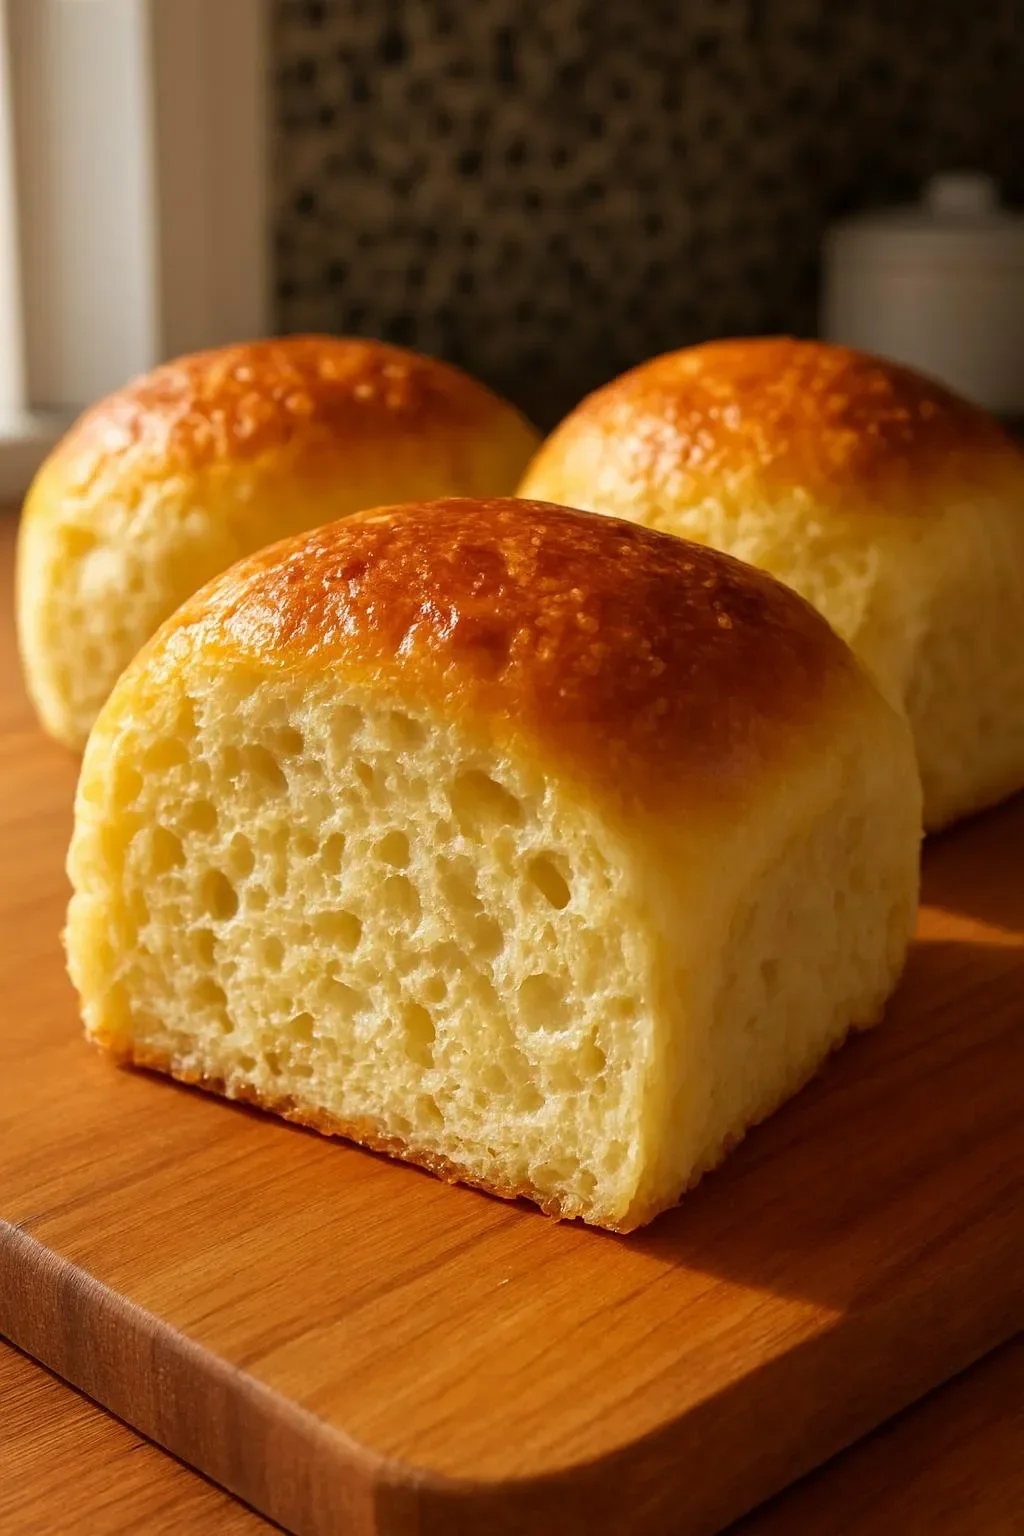
These gluten free bread rolls are soft, slightly chewy, and light enough to disappear at the dinner table. I developed this 5-step method after testing dozens of flours and techniques to get consistently fluffy results. As a home baker who’s adapted many wheat recipes, I’ll share what worked best every time.
Why Make This Recipe
- They taste like traditional dinner rolls—soft interior with a light crust—without gluten.
- Made from a balanced gluten-free flour blend, they hold up well for sandwiches and sides.
- They’re quick to mix and use a single rise, so you can have fresh rolls in about 2 hours.
- Great for holidays, weeknight dinners, or meal prep since they freeze and reheat beautifully.
- Personal insight: I love these because the crumb stays tender for days when stored correctly—no gritty texture.
Also, if you’re curious about store-bought options while you perfect homemade rolls, check this best store-bought gluten-free bread roundup I refer to often.
Recipe Overview
- Prep time: 25 minutes (active), plus 60–75 minutes rise time
- Cook time: 18–22 minutes
- Total time: 1 hour 45 minutes (including rise)
- Servings: 12 rolls (about 60–70 g each)
- Difficulty: Easy–Medium
- Method: Mix, proof once, shape into rolls, bake at 375°F (190°C) until golden and hollow-sounding
My Experience Making This Recipe
I tested this recipe across multiple gluten-free flour blends and hydration levels to avoid gummy centers. The biggest discovery was that a small amount of xanthan gum (or psyllium husk) and proper steam in the oven gives the best crust and lift. I adjusted water temperature and kneading time to ensure reliable yeast activation.
How to Make Gluten Free Bread Rolls: 5 Steps to Fluffy Perfection
This recipe follows five clear steps: proof the yeast, mix wet and dry ingredients, combine and knead briefly in a stand mixer or by hand, proof the shaped rolls once, then bake with steam. Key techniques include using warm liquid (100–110°F/38–43°C) to activate yeast, gentle but thorough mixing to hydrate the flour, and creating oven steam for a tender crust. Expect a slightly sticky dough that becomes easier to handle after a short rest.
Basic ingredient example for 12 rolls (use your preferred gluten-free flour blend):
- 3 cups (420 g) gluten-free all-purpose flour (contains xanthan gum)
- 2 1/4 tsp (7 g) active dry yeast (1 packet)
- 1 cup (240 ml) warm milk or dairy-free milk, 100–110°F (38–43°C)
- 2 large eggs, room temperature
- 3 tbsp (45 g) unsalted butter or dairy-free spread, melted
- 2 tbsp (25 g) sugar or honey
- 1 tsp salt
- 1–2 tbsp olive oil for bowl and brushing
5-step process summary:
- Proof yeast in warm milk with sugar for 5–10 minutes until foamy.
- Whisk dry ingredients separately; add eggs and melted butter to the yeast mixture.
- Combine wet and dry in a mixer with a paddle or by hand until cohesive; let rest 10 minutes.
- Divide into 12 portions, shape into rolls, place on a parchment-lined tray, and proof 45–60 minutes until puffy.
- Brush with oil or egg wash, bake at 375°F (190°C) for 18–22 minutes until golden and internal temp ~200°F (93°C).
Expert Tips for Success
- Temperature control: Keep liquid 100–110°F (38–43°C) to wake yeast without killing it. Use an instant-read thermometer.
- Flour choice: Use a multi-grain gluten-free all-purpose blend with xanthan gum (or add 1 tsp xanthan/psyllium per cup of flour). This gives structure and chew.
- Hydration is key: Gluten-free dough often looks wetter; resist adding too much extra flour. A slightly sticky dough yields a softer crumb.
- Steam for a tender crust: Place a small oven-safe pan on the bottom rack and pour hot water in when you put the rolls in, or spray the oven walls quickly before closing.
- Equipment: A stand mixer with a paddle speeds mixing and gives consistent results, but you can mix by hand with a sturdy spatula.
How to Serve Gluten Free Bread Rolls: 5 Steps to Fluffy Perfection
- Dinner side: Serve warm with softened butter and flaky sea salt for dinner guests.
- Slider or sandwich: Split and fill with roasted turkey, avocado, or a vegan patty for handheld meals.
- Brunch: Turn them into breakfast sandwiches with egg, cheese, and greens.
- Presentation tip: Brush with melted butter and sprinkle chopped herbs (parsley or chives) before serving to add color and aroma.
Storage and Reheating Guide
- Room temperature: Keep in an airtight container or resealable bag for up to 2 days to retain softness.
- Refrigerator: I don’t recommend refrigerating as it speeds staling; use only if your kitchen is very warm.
- Freezing: Cool completely, wrap individually in plastic wrap and place into a freezer bag for up to 3 months.
- Reheating: Thaw at room temperature, then reheat in a 300°F (150°C) oven for 8–12 minutes, or microwave covered for 20–30 seconds and finish in toaster oven for crust.
Recipe Variations
- Dairy-free: Replace milk with unsweetened almond or oat milk and use dairy-free butter or oil. The texture remains soft.
- Egg-free: Use 1/4 cup applesauce + 2 tbsp aquafaba per egg as an experiment; add 1 tsp extra xanthan gum for structure.
- Herb and garlic rolls: Fold 1–2 tbsp chopped fresh herbs and 1 minced garlic clove into the dough before shaping.
- Whole-grain gluten-free: Substitute up to 30% of the flour with buckwheat or sorghum flour and increase liquid by 1–2 tbsp.
Nutritional Highlights
- These rolls are gluten-free and can be adapted to be dairy-free or egg-free.
- They provide carbohydrates and moderate protein from eggs; using whole-grain GF flour increases fiber.
- Allergen note: Contains eggs and may contain dairy unless substituted; check your flour blend for soy or nut ingredients. Serve one roll per person as a typical portion (60–70 g).
Troubleshooting Common Issues
- Dense or heavy rolls: Likely under-proofed or yeast was old. Ensure yeast is active (foam forms in 5–10 minutes) and allow rolls to nearly double in size.
- Gummy center: Overhydration for a particular flour or insufficient bake time. Reduce liquid by 1–2 tbsp or bake a few minutes longer; check internal temp ~200°F (93°C).
- No rise at all: Check yeast freshness, water temp (not too hot), and sugar presence. If mixture never foams, start over with new yeast.
Frequently Asked Questions
Q: Can I make this dough ahead and refrigerate overnight?
A: Yes. After the first brief mix/rest and shaping, place the rolls on the tray, cover tightly, and refrigerate up to 12 hours for a slow cold proof. Remove and allow to come to room temperature (30–45 minutes) before baking; you may need a few extra minutes in the oven.
Q: Can I use instant yeast instead of active dry yeast?
A: Absolutely. Use the same weight (2 1/4 tsp) and add it straight to the dry ingredients; you don’t need to proof in water. Still use warm liquid for dough temperature control.
Q: Why does my gluten-free dough feel so sticky?
A: Gluten-free flours absorb water differently and lack elasticity, so dough remains tacky. Lightly oil your hands and use a wet spatula for portioning. A short 10-minute rest helps hydration and makes shaping easier.
Q: How do I get a shiny, golden top without eggs?
A: Brush with melted dairy-free butter or a 1:1 mix of milk alternative and maple syrup before baking. For extra shine, brush again right after baking while warm.
Conclusion
For more inspiration and to compare techniques, I often reference other tested recipes such as The Softest Gluten Free Dinner Rolls – The Loopy Whisk and Gluten-free Pull-Apart Dinner Rolls {dairy-free option} for shaping ideas. If you like sweet variations, try adapting methods from The Softest Gluten Free Cinnamon Rolls – The Loopy Whisk. For a different texture and ingredient list, check Gluten-Free Dinner Rolls – Mama Knows Gluten Free. And if you want a vegan bun approach that still yields soft results, see Vegan Burger Buns (Soft and Fluffy) – Jessica in the Kitchen.
Print
Gluten Free Bread Rolls
Soft and chewy gluten-free bread rolls perfect for dinner tables or meal prep.
- Total Time: 105 minutes
- Yield: 12 rolls 1x
Ingredients
- 3 cups (420 g) gluten-free all-purpose flour (contains xanthan gum)
- 2 1/4 tsp (7 g) active dry yeast (1 packet)
- 1 cup (240 ml) warm milk or dairy-free milk, 100–110°F (38–43°C)
- 2 large eggs, room temperature
- 3 tbsp (45 g) unsalted butter or dairy-free spread, melted
- 2 tbsp (25 g) sugar or honey
- 1 tsp salt
- 1–2 tbsp olive oil for bowl and brushing
Instructions
- Proof the yeast in warm milk with sugar for 5–10 minutes until foamy.
- Whisk dry ingredients separately; add eggs and melted butter to the yeast mixture.
- Combine wet and dry in a mixer with a paddle or by hand until cohesive; let rest for 10 minutes.
- Divide into 12 portions, shape into rolls, place on a parchment-lined tray, and proof for 45–60 minutes until puffy.
- Brush with oil or egg wash, then bake at 375°F (190°C) for 18–22 minutes until golden and hollow-sounding.
Notes
Store in an airtight container for up to 2 days or freeze for up to 3 months. To reheat, thaw and warm in the oven.
- Prep Time: 25 minutes
- Cook Time: 20 minutes
- Category: Bread
- Method: Baking
- Cuisine: American
- Diet: Gluten-Free
Nutrition
- Serving Size: 1 roll
- Calories: 150
- Sugar: 5g
- Sodium: 190mg
- Fat: 6g
- Saturated Fat: 3g
- Unsaturated Fat: 2g
- Trans Fat: 0g
- Carbohydrates: 20g
- Fiber: 2g
- Protein: 4g
- Cholesterol: 50mg