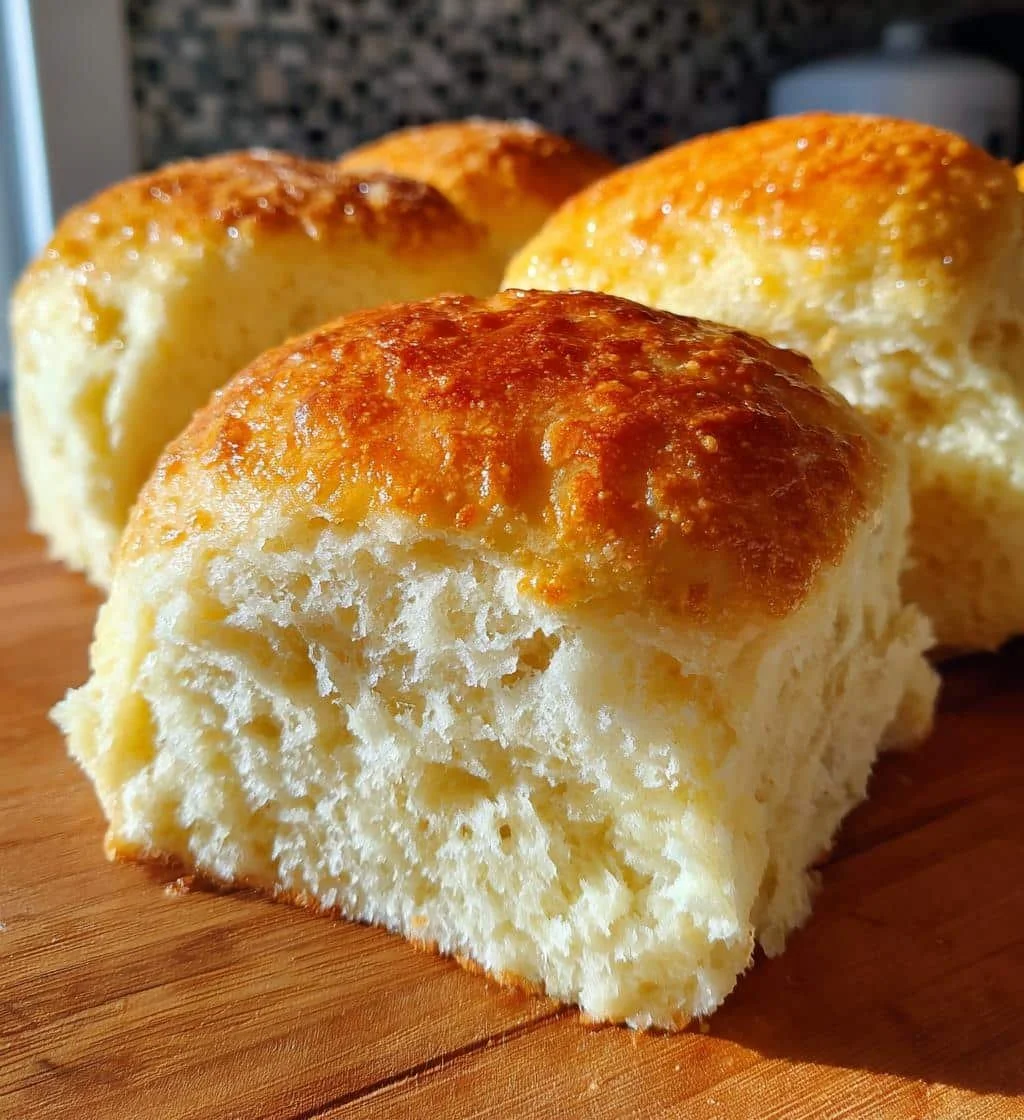
These gluten free bread rolls turn out tender, airy, and reliably fluffy — even if you’ve struggled with gluten-free baking before. I’ve made them dozens of times for family dinners and found one small technique that changed everything. For the full recipe details and step photos, you can also check this full recipe page I used when testing.
Why Make This Recipe
- They taste soft and slightly sweet, with a golden crust that invites butter and jam.
- The recipe is practical for weeknight dinners or holiday sides because it uses pantry-friendly ingredients.
- Texture-focused techniques (hydration, warm proofing, gentle shaping) deliver consistent results.
- You can adapt them to dairy-free or egg-free diets with reliable swaps.
- Personal note: I love how these rolls hold up wrapped sandwiches without crumbling — that reliability made me cook them again and again. For a comparison with store-bought options, see this buying guide.
Recipe Overview
- Prep time: 25–35 minutes active (plus 60–75 minutes rising time).
- Cook time: 18–22 minutes at 375°F (190°C).
- Total time: about 2 hours (includes two rises).
- Servings: makes 10–12 medium rolls.
- Difficulty: Easy to Medium — requires basic mixing, proofing, and shaping.
- Method: Mix a gluten-free all-purpose flour blend with yeast, sugar, fat, and eggs; proof twice and bake on a parchment-lined tray with optional steam for a glossy crust.
My Experience Making This Recipe
On early tests the rolls were dense; I adjusted hydration and added an egg for structure and softness. Using a warm proofing spot (75–85°F) and a light steam in the oven produced the lift and crust I wanted. After those tweaks the rolls came out soft inside with a thin, golden exterior every time.
How to Make Gluten Free Bread Rolls: 5 Steps to Fluffy Perfection
The process follows five clear steps: warm yeast activation, mixing to a batter-like dough, first rise, gentle shaping, then final proof and bake. Key techniques are measuring flour by weight or spoon-and-level, keeping liquid at 105–115°F (40–46°C) for yeast activation, and avoiding overworking—gluten-free dough benefits from gentle handling. If you want a photo-guided approach, this step-by-step method has visual tips I found useful while experimenting.
Expert Tips for Success
- Use a reliable gluten-free all-purpose flour that contains a binder (xanthan gum or guar gum) or add 1 tsp per cup if it’s missing.
- Weigh ingredients when possible: 300 g GF flour, 360 g total liquids yields a moist dough that proofs well.
- Keep liquids warm (105–115°F/40–46°C) when activating yeast; hotter will kill the yeast, colder slows it down.
- Create oven steam for a glossy crust: place a small pan with 1 cup boiling water on the bottom rack when you put the rolls in, or spray water into the oven immediately.
- Use a stand mixer with paddle attachment for 1–2 minutes to fully hydrate the batter, then rest 10 minutes before shaping; this autolyse-style rest improves crumb.
For simple, ingredient-light ideas that affect dough hydration, I also referenced tips in this 5-ingredient flatbread guide during testing.
How to Serve Gluten Free Bread Rolls: 5 Steps to Fluffy Perfection
- Brush warm rolls with melted butter or olive oil and sprinkle flaky sea salt for a simple presentation.
- Split and fill with roasted turkey, greens, and cranberry sauce for a festive sandwich.
- Serve alongside soups or stews — they’re excellent dunkers because they stay intact.
- Arrange on a warmed basket lined with a cloth napkin and offer compound butters (herb or garlic) for a dinner-party touch.
Storage and Reheating Guide
- Store cooled rolls in an airtight container at room temperature for up to 2 days to preserve softness.
- For longer storage, freeze individual rolls in a single layer on a sheet tray, then transfer to a sealed freezer bag for up to 3 months.
- Reheat from frozen at 325°F (160°C) for 12–15 minutes, or thaw then warm at 300°F (150°C) for 8–10 minutes; brush with butter and tent with foil if you want to retain moisture.
- Avoid microwaving for extended periods — it makes gluten-free bread rubbery; short 12–15 second bursts can soften a refrigerated roll for immediate serving.
Recipe Variations
- Dairy-free: Replace milk with unsweetened almond or oat milk and swap butter for refined coconut oil or vegan butter at equal weight.
- Egg-free: Use a commercial egg replacer or 3 tbsp ground flaxseed mixed with 9 tbsp water (let gel) to replace two eggs; increase binder slightly if needed.
- Whole-grain: Use a blend that includes 25% buckwheat or sorghum for nuttiness; increase hydration by 10–20 g.
- Herb & cheese: Fold 1/2 cup grated Parmesan and 2 tbsp chopped fresh rosemary into the dough for savory rolls, or follow a biscuit-style riff inspired by this biscuits variation for a flaky approach.
Nutritional Highlights
- These rolls are typically lower in fiber than whole-grain breads unless you add sorghum or buckwheat; consider adding seeds for fiber and healthy fats.
- They are naturally gluten-free; check labels for cross-contamination if you have celiac disease.
- Allergen note: standard recipe includes eggs and dairy; see variations above for swaps. Portion guidance: one medium roll ~120–160 kcal depending on fats used.
Troubleshooting Common Issues
- Problem: Rolls are dense and heavy. Solution: Increase liquid by 5–10% next batch, ensure yeast was fresh, and proof in a 75–85°F spot for a full rise.
- Problem: Crumbly or falling apart. Solution: Add a binder (1 tsp xanthan gum per cup of flour if not present) and include at least one egg or egg substitute to improve structure.
- Problem: Pale tops and poor crust. Solution: Brush with egg wash or milk before baking and introduce oven steam in the first 5 minutes for better browning.
Frequently Asked Questions
Q: Can I use active dry yeast instead of instant?
A: Yes—proof active dry yeast in 1/4 cup of the warm liquid with a teaspoon of sugar for 5–10 minutes until foamy, then mix into the dough. Reduce total liquid slightly if your dough becomes too loose.
Q: How do I know when the rolls are fully baked?
A: Internal temperature should reach 190–200°F (88–93°C) for enriched GF dough. They should sound hollow when tapped on the bottom and be golden on top.
Q: Can I make the dough ahead and bake later?
A: Yes. After the first rise, shape the rolls and refrigerate covered for up to 24 hours. Bring to room temperature for 30–60 minutes and give a short final proof before baking.
Q: Why does my gluten-free dough behave like a batter?
A: Many gluten-free bread doughs are wetter than wheat doughs because they rely on hydration and binders rather than gluten. Expect a tacky, scoopable batter-like dough; gentle shaping with wet or oiled hands works best.
Conclusion
If you want more visual cues and a closely related tested recipe, check out The Softest Gluten Free Dinner Rolls – The Loopy Whisk for extra inspiration and step-by-step photos.
Print
Fluffy Gluten-Free Bread Rolls
Tender and airy gluten-free bread rolls that are perfect for sandwiches or as a side for dinner.
- Total Time: 115 minutes
- Yield: 10-12 medium rolls 1x
Ingredients
- 300 g gluten-free all-purpose flour
- 1 tsp instant yeast
- 2 tbsp sugar
- 1 tsp salt
- 2 large eggs
- 360 g warm liquid (water or milk)
- 2 tbsp melted butter or olive oil
Instructions
- Activate the yeast in warm liquid (105–115°F) with sugar for about 5 minutes.
- Mix the flour, eggs, and salt into the yeast mixture to form a batter-like dough.
- Cover and allow the dough to rise in a warm place for 30–45 minutes.
- Gently shape the dough into rolls and place them on a parchment-lined tray.
- Let the rolls rise again for another 30 minutes, then bake at 375°F (190°C) for 18–22 minutes.
Notes
For best results, weigh ingredients and ensure yeast is fresh. Optional: create steam in the oven for a glossy crust.
- Prep Time: 95 minutes
- Cook Time: 20 minutes
- Category: Side Dish
- Method: Baking
- Cuisine: American
- Diet: Gluten-Free
Nutrition
- Serving Size: 1 roll
- Calories: 150
- Sugar: 2g
- Sodium: 200mg
- Fat: 5g
- Saturated Fat: 2g
- Unsaturated Fat: 3g
- Trans Fat: 0g
- Carbohydrates: 22g
- Fiber: 1g
- Protein: 4g
- Cholesterol: 50mg