Everything you thought you knew about Halloween gluten-free bread shaping is about to change forever.
For years, bakers have approached gluten-free Halloween breads with fear and trepidation, often after experiencing common Halloween bread failures, leading them to follow “safe” techniques that produce the same predictable pumpkins and lifeless ghosts. We’ve been conditioned to believe that gluten-free dough is fragile and temperamental, requiring the gentlest touch and whispered prayers to the baking gods.
But what if this entire mindset is fundamentally wrong? What if the techniques taught in culinary schools are actually holding us back from creating truly spectacular Halloween masterpieces?
It’s time to revolutionize your approach to shaping gluten-free bread and discover why conventional wisdom might be your biggest obstacle to success.
Why Traditional Halloween Bread Shaping Fails (And What to Do Instead)
The problem isn’t your skill level or your ingredients—it’s your approach. Most bakers treat gluten-free dough like it’s made of spun glass, when they should be treating it like premium sculpting clay.
Here’s the truth that will change everything: gluten-free dough’s perceived “weakness” is actually its greatest strength.
Unlike stubborn wheat-based doughs that fight complex manipulation, gluten-free mixtures are inherently more plastic and responsive. They want to be shaped into extraordinary forms—we just need to stop approaching them with fear.
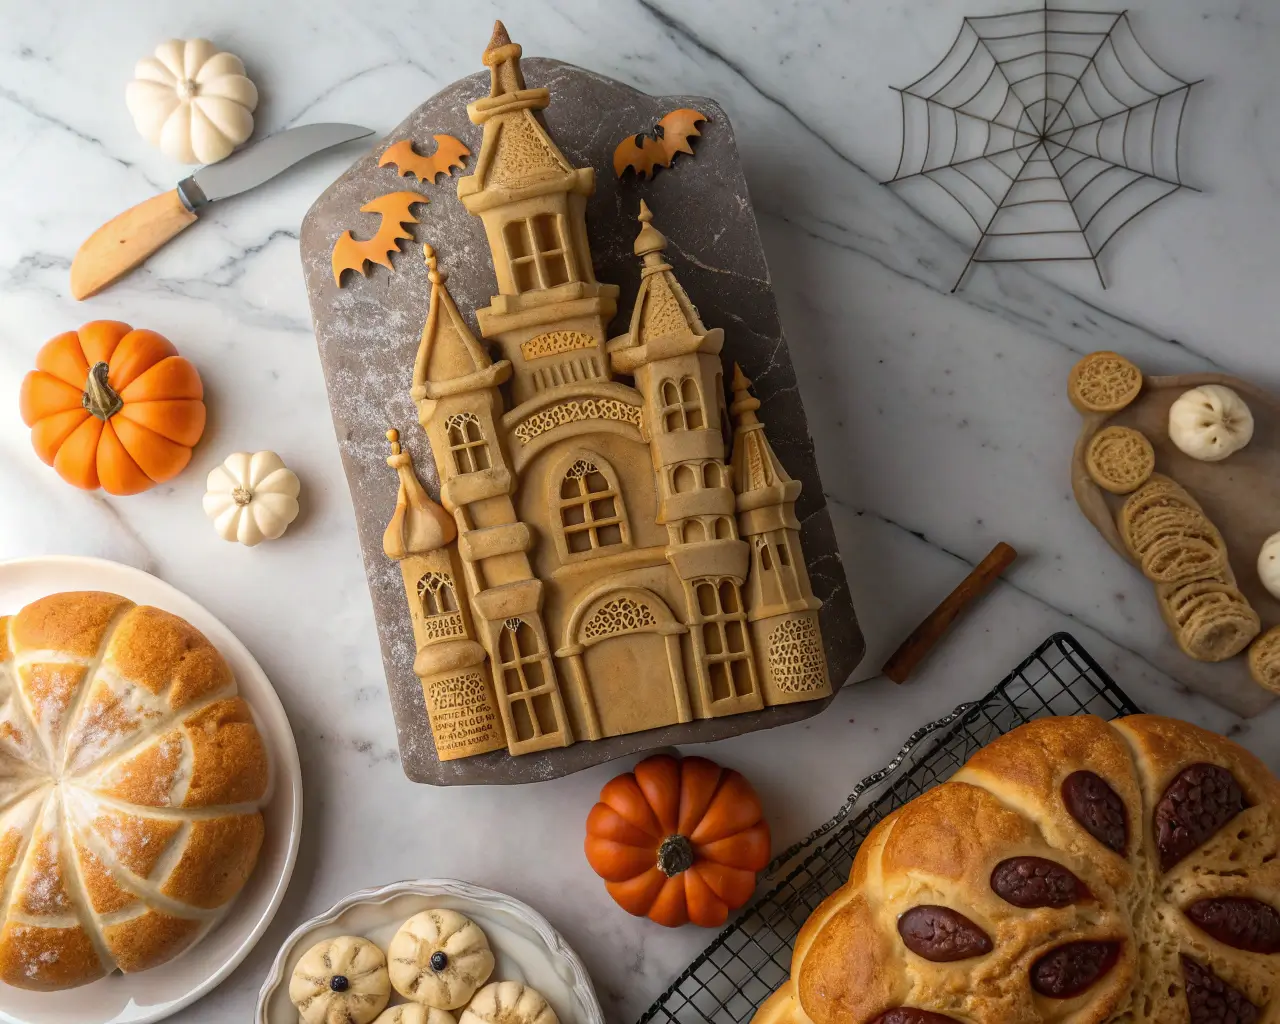
Professional baker Sarah Chen discovered this by accident when her “failed” pumpkin shape collapsed. Instead of starting over, she worked with the collapsed form, creating intricate cave-like structures that became her signature “Haunted Cavern” loaves—impossible to achieve with traditional wheat dough.
Quick Win: Stop treating your dough like it’s dying. Start treating it like premium modeling compound, and watch what becomes possible.
Revolutionary Technique #1: The Cold Shaping Method
Every gluten-free baking guide preaches the same gospel: work with room temperature dough for “optimal handling.” This advice is catastrophically wrong for Halloween shaping.
Cold dough is your secret weapon.
Refrigerated gluten-free dough behaves like professional modeling compound—it slows fermentation, extends working time, and creates a firmer consistency that holds intricate details beautifully. While conventional wisdom warns against cold dough as “difficult,” innovative bakers have discovered it’s vastly superior for detailed work.
Research from culinary experts confirms that temperature manipulation significantly affects dough workability. Professional baking authorities at King Arthur emphasize that “one of the most important skills a baker must learn is the ability to accurately control dough temperature” for consistent results.
Professional food artist Marcus Rodriguez built his reputation on impossibly detailed Halloween bread sculptures using this exact technique. Multi-tiered haunted houses, intricate spider webs, elaborate skeleton forms—all shaped with dough straight from the refrigerator.
How to Master Cold Shaping:
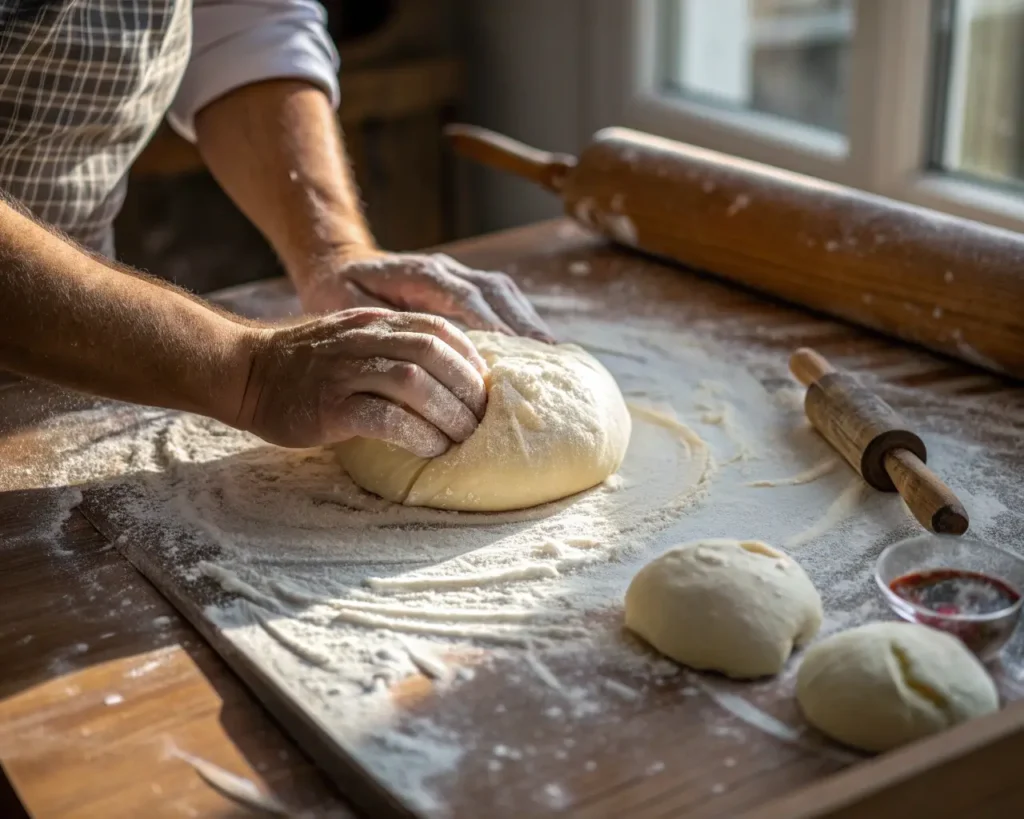
- Prepare your dough using your favorite gluten-free bread recipe for beginners
- Refrigerate for 2-4 hours before shaping (not overnight—that’s too cold)
- Work quickly while the dough maintains its ideal consistency
- Return to fridge between complex shaping steps if needed
Pro Tip: Divide your next batch in half. Work with one portion at room temperature, the other straight from the fridge. The difference will amaze you.
Revolutionary Technique #2: The Moisture Paradox Strategy
Traditional gluten-free bread making obsesses over precise hydration levels, seeking that supposedly perfect moisture balance. But perfection is the enemy of artistry.
The most stunning Halloween shapes come from deliberately working with “imperfect” hydration levels—specifically, intentionally under-hydrated doughs that conventional wisdom would reject as failures.
These drier doughs hold sharp edges, maintain structural integrity during complex manipulation, and create textures impossible to achieve with “properly” hydrated mixtures. This approach aligns with scientific research from the National Center for Biotechnology Information, which confirms that hydration level optimization is crucial for maximizing gluten-free bread quality and that “the hydration effect is much more evident in breads prepared with HPMC than in those made with psyllium or xanthan gum”.
Celebrity Halloween baker Victoria Nash stumbled upon this during what she considered her worst baking disaster. Her significantly under-hydrated dough seemed ruined, but she aggressively manipulated it anyway, creating sharp, angular forms that became her signature “Fractured Coffin” loaves—featured in Food & Wine magazine and replicated worldwide.
The Under-Hydration Formula:
- Reduce liquid by 10-15% from your standard recipe
- Add liquid gradually if the dough becomes too crumbly
- Embrace the resistance—it’s creating better structure
- Work decisively—hesitation leads to cracks
For more guidance on adjusting hydration levels, check out our complete guide to gluten-free bread troubleshooting.
Revolutionary Technique #3: Lightning Speed Shaping
Conventional wisdom preaches patience: longer fermentation times, extended resting periods, careful scheduling. This makes perfect sense for traditional loaf production but becomes counterproductive for Halloween shaping.
Fast, aggressive shaping produces superior Halloween results.
Extended fermentation breaks down gluten-free dough structure, making detailed manipulation increasingly difficult. Revolutionary bakers do the opposite—they shape quickly, decisively, immediately after mixing, capturing the dough at its peak structural integrity.
Professional Halloween bread sculptor James Park revolutionized the field with his “Lightning Shaping” technique, completing all structural work within 30 minutes of mixing. His impossibly intricate Halloween village displays feature dozens of interconnected buildings with architectural details that would be impossible using traditional slow-shaping methods.
Master Lightning Shaping in 4 Steps:
- Plan your designs before you start mixing (sketches help enormously)
- Gather all tools and have them ready
- Shape immediately after final mix—no resting period
- Work section by section rather than trying to perfect each area
This technique pairs perfectly with our artisan gluten-free bread guide for optimal results.
Revolutionary Technique #4: Internal Decoration Revolution
Perhaps the most limiting conventional wisdom concerns decoration philosophy. Traditional approaches focus on external embellishment—surface scoring, applied elements, post-baking decorations. The dough itself remains neutral.
This thinking caps creative potential at the surface level.
True Halloween bread artistry happens inside the dough, not on top of it.
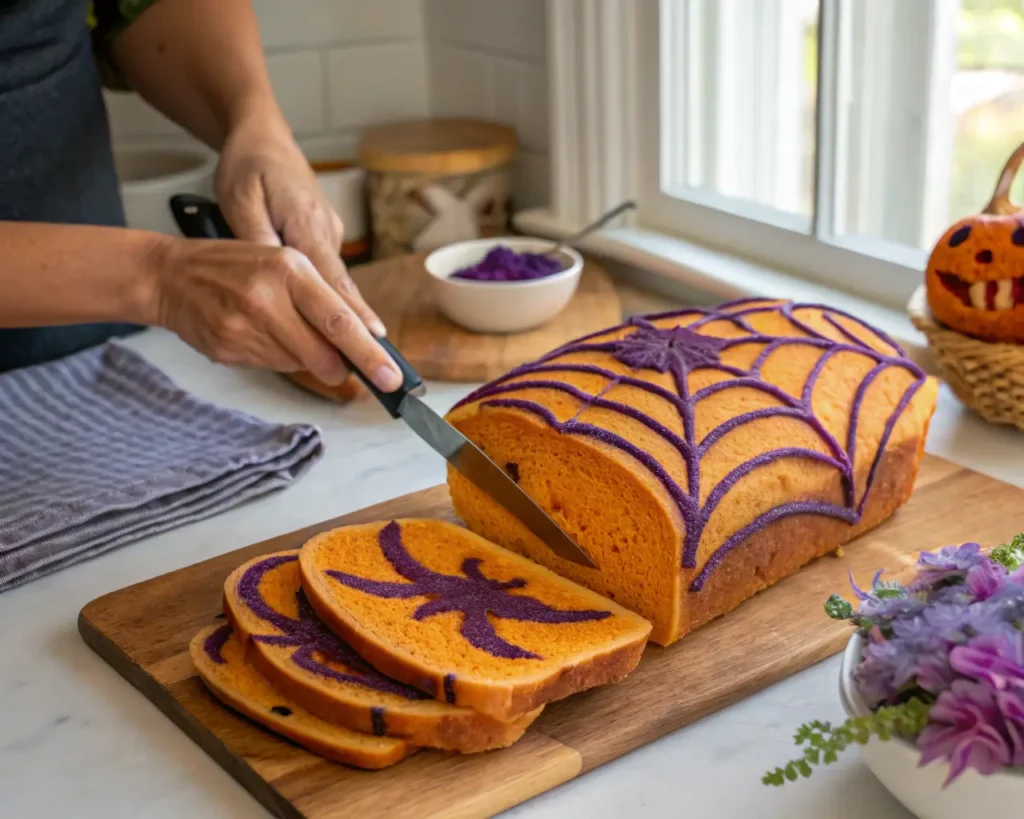
By incorporating colored ingredients directly into different portions of dough before shaping, you can create internal color patterns, hidden surprises, and visual effects impossible to achieve through surface decoration alone.
Christina Walsh pioneered the “Hidden Halloween” technique—creating seemingly simple pumpkin-shaped loaves that reveal elaborate internal designs when sliced. Spider webs, bat silhouettes, even complex scenes spanning multiple slices.
Her breads became legendary at Halloween parties, transforming the simple act of slicing bread into moments of magical revelation.
Creating Internal Magic:
Natural Coloring Options:
- Orange: Pumpkin puree or sweet potato (try our pumpkin sweet gluten-free bread for inspiration)
- Black: Activated charcoal or black cocoa powder
- Purple: Butterfly pea flower or purple sweet potato
- Green: Spinach powder or matcha
Design Techniques:
- Marbling: Fold colored portions together partially
- Layering: Stack different colored doughs
- Embedding: Roll colored dough into neutral base
- Surprise centers: Hide colored cores inside neutral exteriors
Learn more about storing gluten-free bread to keep your Halloween creations fresh longer.
Revolutionary Technique #5: The Structural Support System
Now comes the final revolution that fundamentally involves rethinking structural support entirely. Rather than hoping your shaped dough maintains its form through willpower alone, instead create internal support systems that absolutely guarantee success. This approach transforms uncertainty into confidence, ensuring your Halloween creations hold their ambitious shapes every single time.
Hidden armatures change everything.
For decades, professional cake decorators have successfully used internal supports—now, it’s time bread bakers finally adopted the same proven strategies. Specifically, wooden skewers, parchment paper tubes, and even aluminum foil cores can provide completely invisible structural support that ultimately allows for ambitious architectural designs. Moreover, these techniques aren’t just helpful—they’re revolutionary for anyone serious about creating show-stopping Halloween breads.
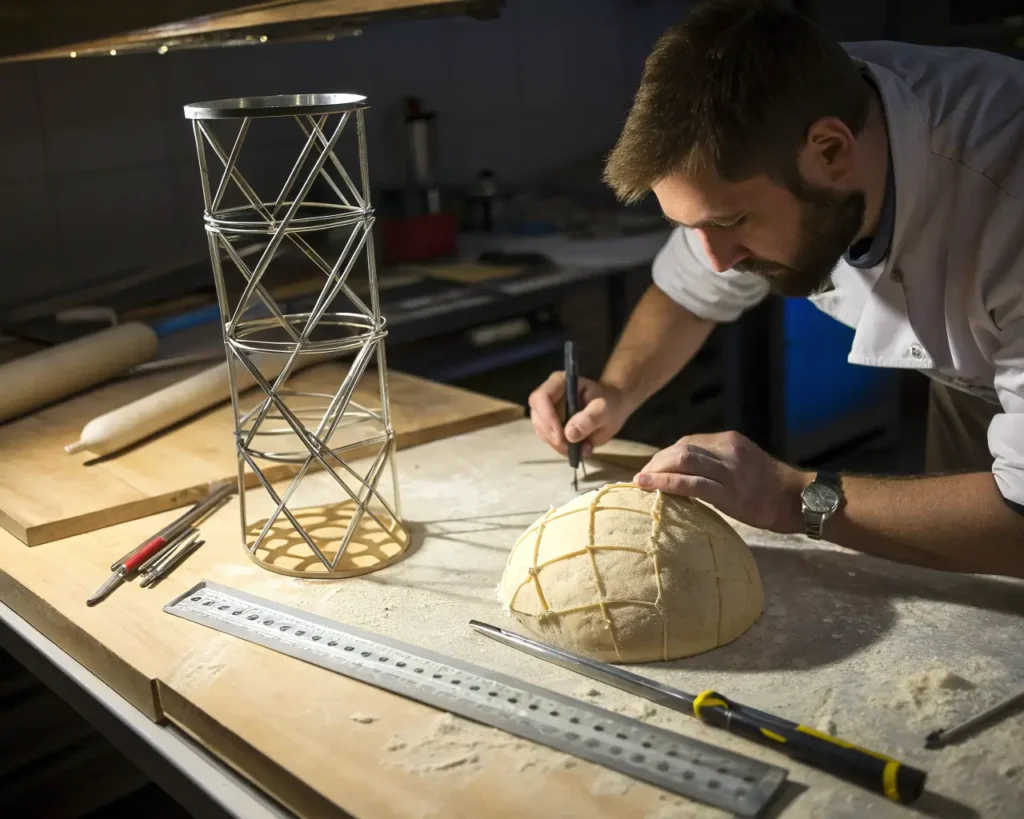
Building Support Systems:
For tall structures:
- Insert wooden skewers as internal “bones”
- Remove before serving (mark insertion points)
Hollow designs:
- Create parchment paper tubes as temporary forms
- Remove after partial baking when structure sets
Overhanging elements:
- Use aluminum foil as temporary support
- Remove during final baking stage
This technique is especially powerful when combined with knowledge from our science of gluten-free yeast-free bread guide.
The Complete Revolutionary Toolkit
Essential Equipment for Revolutionary Shaping:
Basic Tools:
- Bench scraper for clean cuts and sharp edges
- Offset spatula for detailed smoothing
- Small scissors for intricate cuts
- Toothpicks for fine detail work
Advanced Tools:
- Silicone modeling tools for professional detail
- Cookie cutters in Halloween shapes for consistent forms
- Impression mats for texture work
- Small paintbrushes for egg wash application
Temperature Tools:
- Instant-read thermometer for monitoring dough temperature
- Kitchen scale for precise measurements
- Timer for tracking working time
For equipment guidance specific to gluten-free baking, see our artisan gluten-free bread guide which covers essential tools.
Revolutionary Recipe Modifications
Transform any standard gluten-free bread recipe into a Halloween masterpiece with these modifications:
Base Recipe Adjustments:
- Reduce liquid by 10-15% for better structure
- Add 1 tbsp extra binding agent (learn more about xanthan gum in gluten-free bread or psyllium husk gluten-free bread)
- Include 2 tbsp potato starch for improved plasticity
- Use room temperature eggs for better incorporation
Flavor Enhancements:
- Pumpkin spice blend for seasonal taste
- Orange zest for subtle citrus notes
- Vanilla extract for depth
- Pinch of salt to enhance all flavors
Texture Improvements:
- Substitute buttermilk for regular milk (more tang and structure)
- Add 1 tbsp olive oil for improved handling
- Include 1 tsp apple cider vinegar for better rise
For more seasonal inspiration, explore our gluten-free sweet potato rolls which use similar shaping techniques.
From Revolution to Results: Your Action Plan
Ready to revolutionize your Halloween baking forever? Here’s your step-by-step revolution:
New to Halloween bread baking? Start with our Halloween gluten-free bread made simple guide for foolproof basics, then return here to master these advanced revolutionary techniques.
First Week: Master the Basics
- Try the cold shaping method with a simple pumpkin design
- Experiment with under-hydration levels
- Practice lightning shaping timing
Second Week: Add Complexity
- Incorporate internal decorations into basic shapes
- Build your first structural support system
- Create designs with multiple components
Third Week: Go Full Revolutionary
- Combine all five techniques in one ambitious project
- Document your results and refine your process
- Share your creations and inspire other baking revolutionaries
Troubleshooting Your Revolution
First problem: Dough cracking during shaping Solution: Slightly increase hydration, work faster, keep hands damp
Second problem: Shapes losing definition during baking Solution: Use internal supports, lower initial oven temperature
Third problem: Internal decorations bleeding together Solution: Firmer consistency on colored portions, work faster
Last Problem: Complex shapes taking too long Solution: Practice lightning shaping, pre-plan every move
For comprehensive troubleshooting beyond Halloween shaping, visit our gluten-free bread troubleshooting guide.
The Science Behind the Revolution
Understanding why these techniques work makes you a better baker:
Cold Shaping Science:
- Lower temperatures slow enzyme activity
- Firmer consistency reduces deformation
- Extended working time prevents overworking
Under-Hydration Benefits:
- Stronger gluten-free structure formation
- Less sticky handling experience
- Better shape retention during baking
Speed Shaping Logic:
- Captures peak dough integrity
- Prevents fermentation-related breakdown
- Reduces handling damage
Learn more about the science of gluten-free dairy-free bread to deepen your understanding of dough behavior.
Beyond Halloween: Revolutionary Applications
These techniques aren’t limited to Halloween. Apply revolutionary shaping methods to:
- Christmas architectural breads (try adapting our gluten-free cinnamon raisin bread techniques)
- Easter sculptural loaves (our honey sweetened gluten-free bread works beautifully)
- Birthday celebration breads (combine with vanilla sweet gluten-free bread recipes)
- Wedding centerpiece loaves (elegant sculptural forms)
- Everyday artistic breads (perfect with our best gluten-free sandwich bread base)
For different baking methods, check out baking gluten-free bread in different ovens for optimal results.
Join the Revolution Community
Connect with fellow baking revolutionaries by exploring more of our comprehensive guides:
- Master the basics with gluten-free bread recipes for beginners
- Perfect your technique with artisan gluten-free bread methods
- Understand your ingredients with gluten-free flour blends
- Share your creations on social media with #NoGluBread or join our facebook group community
Your Revolutionary Future Starts Now
Indeed, the time has come to abandon the safety of conventional wisdom and boldly embrace the thrilling uncertainty of true innovation. Furthermore, every technique you’ve been taught, every “rule” you’ve followed, every limitation you’ve accepted—all of it is open to challenge. Moreover, this isn’t just permission to experiment; rather, it’s an urgent call to revolutionary thinking.
Consequently, your Halloween gluten-free bread shaping journey begins precisely the moment you stop asking “What am I allowed to do?” and instead start demanding “What becomes possible when I refuse to accept limitations?” Ultimately, this shift in mindset transforms everything—not only your approach to baking but also your entire creative potential.
Start small but think radically. Take one conventional technique and deliberately do the opposite. Work with cold dough when recipes demand warm. Shape quickly when tradition preaches patience. Embrace “imperfect” hydration levels. Experiment with internal decoration.
Most importantly—document your results. Both successes and failures teach essential lessons. Failure is just data in disguise.
The greatest Halloween bread sculptures in history weren’t created by bakers who followed rules. They were crafted by rebels who dared to ask dangerous questions: What if conventional wisdom is wrong? What if limitations exist only in our minds? What if the path to extraordinary results requires abandoning safe, predictable techniques?
Your mission is clear: become the baker who challenges every assumption, questions every limitation, creates Halloween breads so innovative they redefine what’s possible.
The revolution in Halloween gluten-free bread shaping doesn’t begin with industry leaders or celebrity bakers.
It begins with you. Right now. In your kitchen. With your next batch of dough.
Stop following. Start leading.
The Halloween bread revolution is waiting for your contribution—and honestly? It’s been waiting long enough.
Print
Revolutionary Halloween Gluten-Free Bread
Transform your approach to Halloween baking with innovative techniques for shaping gluten-free bread, creating stunning designs that defy conventional wisdom.
- Total Time: 45 minutes
- Yield: 4 servings
Ingredients
- Gluten-free flour blend
- Water
- Pumpkin puree or sweet potato
- Eggs
- Xanthan gum or psyllium husk
- Potato starch
- Pumpkin spice blend
- Salt
- Olive oil
- Activated charcoal or cocoa powder (for coloring)
Instructions
- Prepare your gluten-free dough as per your favorite recipe.
- Refrigerate the dough for 2-4 hours before shaping.
- Experiment with hydration levels by reducing water content by 10-15%.
- Shape quickly after mixing, using internal supports like wooden skewers or parchment tubes if needed.
- Incorporate colored ingredients and create internal designs for visual effects.
- Keep practicing and refining your technique for more complex shapes.
Notes
Embrace under-hydration for better structure and don’t be afraid to experiment with different techniques to achieve exciting designs.
- Prep Time: 15 minutes
- Cook Time: 30 minutes
- Category: Baking
- Method: Baking
- Cuisine: American
- Diet: Gluten-Free