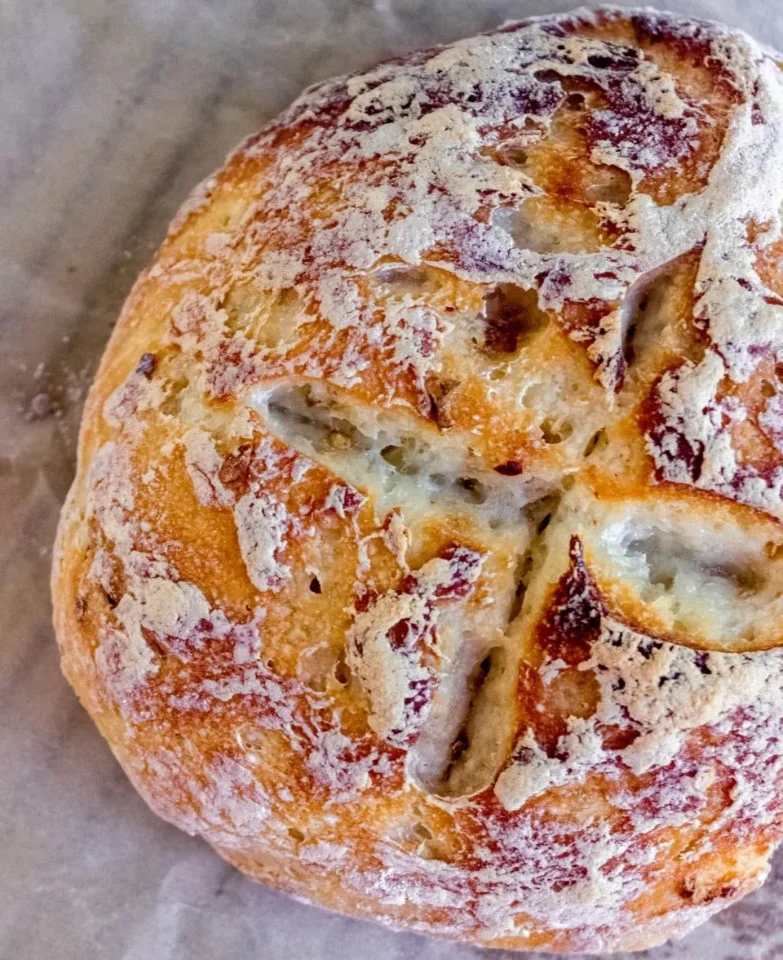
I’ve been making No-Knead Gluten-Free Bread for years, and it’s one of my go-to bakes when I want fresh bread with minimal fuss. This loaf gives a crisp crust and tender crumb without the elbow grease of kneading, and it works well with pantry-friendly ingredients I usually have on hand. If you like sweeter quick-breads, try my spin on an apple-cinnamon loaf for dessert-style slices: https://www.noglubread.com/apple-cinnamon-sweet-gluten-free-bread/.
Why Make This Recipe
- It’s hands-off: mix, rest, and bake — no kneading required, which saves time and effort.
- Great texture: a crisp, golden crust with a moist, springy crumb when you use the right flours and hydration.
- Versatile: slices well for sandwiches or toasts, and it holds up to spreads and toasting. See tips for sandwich-ready loaves in the guide to the best gluten-free sandwich bread: https://www.noglubread.com/best-gluten-free-sandwich-bread/.
- Reliable for busy days or when you don’t want complex techniques — perfect for weeknight dinners or weekend baking.
- Personal note: I love this recipe because it consistently turns out well even when I change flour blends, so it’s forgiving and adaptable.
Recipe Overview
- Prep time: 10 minutes active, plus 1–2 hours resting (bulk rise).
- Cook time: 40–50 minutes (covered then uncovered).
- Total time: ~2 hours (including rise).
- Servings: 10–12 slices (1 standard loaf).
- Difficulty: Easy.
- Method: Mix ingredients, long rest for hydration and yeast activity, then bake in a covered Dutch oven at high heat to create steam and develop a crisp crust. For notes on oven behavior with gluten-free doughs, see this oven comparison guide: https://www.noglubread.com/baking-gluten-free-bread-different-ovens/.
My Experience Making This Recipe
I tested variations using different gluten-free flours and bakers’ techniques until the crumb held together without xanthan gum overload. I learned that a higher hydration and brief covered bake (like a Dutch oven at 450°F/230°C) give the best crust and internal crumb. Small changes — psyllium husk, steam, or target internal temp — made the biggest improvements.
How to Make No-Knead Gluten-Free Bread
Start by whisking your dry ingredients: 3 cups gluten-free all-purpose flour (blend with xanthan gum or add 1 tsp), 1 1/2 tsp instant yeast, 1 1/2 tsp salt, and 1 tbsp sugar. Stir wet ingredients into the dry: 1 1/2 cups warm water (about 110°F/43°C), 2 tbsp olive oil, and 1 tsp apple cider vinegar; add 1 tbsp psyllium husk if using for structure. Mix until a thick, sticky batter forms, cover, and let rise at room temperature for 60–90 minutes until bubbly. Transfer to a floured surface or parchment, shape gently into a loaf, and bake covered in a preheated Dutch oven at 450°F (230°C) for 30 minutes, uncover and bake another 10–15 minutes until the internal temperature reaches 205–210°F (96–99°C). Cool on a rack for at least 1 hour before slicing.
Expert Tips for Success
- Hydration matters: gluten-free breads need more water to hydrate starches fully; expect a batter-like dough rather than a traditional smooth dough. For flour substitutions and liquid choices, consult this flour and milk guide: https://www.noglubread.com/best-flours-milks-gluten-free-dairy-free-bread/.
- Use a thermometer: aim for 205–210°F internal temp to ensure the crumb isn’t gummy; an instant-read thermometer prevents underbaking.
- Dutch oven steam: bake covered for the first 25–30 minutes to trap steam and develop a shiny, crisp crust; if you don’t have one, use a covered oven-safe pot or place a tray of hot water on the rack below.
- Psyllium works wonders: 1 tablespoon psyllium husk powder adds elasticity and improves sliceability; skip it only if you have an intolerance.
- Warm proofing spot: proof at about 75–85°F (24–29°C) for consistent yeast activity; in cooler kitchens, use your oven’s light on or a warm microwave to create a gentle environment.
How to Serve No-Knead Gluten-Free Bread
- Morning toast: slice and toast lightly, then spread with butter, jam, or ricotta for a hearty breakfast.
- Sandwiches: allow the loaf to cool fully before slicing thin for tighter sandwich slices; it’s excellent with grilled vegetables or deli fillings.
- Soups and stews: serve thick slices toasted under broiler with garlic butter for dipping.
- Entertaining: present a torn loaf on a board with flavored olive oils, herb butter, or a cheese selection for casual gatherings.
Storage and Reheating Guide
Store cooled slices in an airtight container or a resealable bag at room temperature for up to 2 days. For longer storage, freeze whole or sliced bread in a vacuum-sealed bag or double-wrapped freezer bag for up to 3 months; thaw at room temperature or directly toast from frozen. To refresh stale bread, sprinkle the loaf with a few drops of water and bake at 350°F (175°C) for 8–10 minutes, or toast slices until warm and crisp. For sandwich use after freezing, slice before freezing so you can pull individual portions as needed; more on making sandwich-ready loaves here: https://www.noglubread.com/best-gluten-free-sandwich-bread/.
Recipe Variations
- Dairy-free: use neutral oil (olive or avocado) and water or unsweetened non-dairy milk (room temp) instead of dairy milk.
- Seeded whole-grain: substitute 1 cup of the flour with buckwheat or sorghum and add 1/3 cup mixed seeds (sunflower, flax, pumpkin) for texture.
- Herb and garlic: fold in 1–2 tbsp chopped fresh herbs and 1 tsp garlic powder to the dry mix for an aromatic savory loaf.
- Sourdough-style: replace 1/2 cup water with 1/2 cup active gluten-free starter and reduce yeast to 1/2 tsp; allow a longer bulk ferment (3–6 hours) for deeper flavor.
Nutritional Highlights
- Lower in refined wheat: naturally gluten-free flours like brown rice or sorghum provide whole-grain options and different micronutrient profiles.
- Healthy fats option: using olive or avocado oil adds monounsaturated fats compared with butter.
- Allergen note: this recipe is gluten-free but may contain eggs, dairy, or nuts depending on your flour blend or add-ins; always check flour labels and cross-contamination if you have celiac disease. Aim for 1–2 slices per serving depending on appetite and accompaniment.
Troubleshooting Common Issues
- Dense or gummy crumb: likely underbaked or insufficient internal temperature; bake until 205–210°F and use a higher hydration or add 1 tbsp psyllium husk for structure.
- Loaf collapses after baking: over-proofing or too much yeast can cause collapse; shorten rise time and stick to recommended yeast amounts.
- No crust or pale top: bake at a sufficiently high temperature (450°F/230°C) and bake uncovered for the final 10–15 minutes to brown and crisp the crust.
Frequently Asked Questions
Q: Can I use active dry yeast instead of instant yeast?
A: Yes. If using active dry yeast, proof it in the warm water (about 110°F/43°C) with the sugar for 5–10 minutes until foamy, then mix with dry ingredients. Use the same total yeast weight (about 1 1/2 tsp active dry).
Q: Do I need xanthan gum or can I omit it?
A: If your gluten-free all-purpose blend already contains xanthan or other binders, you can omit extra. If your blend lacks binders, add 1 tsp xanthan gum per cup of flour or 1 tbsp psyllium husk for better structure.
Q: My bread tastes slightly sour — is that normal?
A: Mild tang can come from higher hydration or a longer ferment; it’s especially true if you use a starter. If it’s unpleasantly sour, reduce ferment time and ensure yeast is fresh.
Q: Can I make this in a bread machine or mixer?
A: You can mix ingredients in a stand mixer using the paddle attachment for 1–2 minutes, but avoid overmixing. A bread machine won’t develop crust via steam the same way a Dutch oven does, so bake this loaf in the oven for best results.
Conclusion
If you want another reliable reference for a gluten-free no-knead approach and variations, check this tested recipe and write-up: Gluten-Free No Knead Bread – Laura Ligos Nutrition.
Print
No-Knead Gluten-Free Bread
A hands-off recipe for a crispy crust and tender crumb gluten-free bread that requires no kneading.
- Total Time: 120 minutes
- Yield: 10-12 slices 1x
Ingredients
- 3 cups gluten-free all-purpose flour (plus more for dusting)
- 1 1/2 tsp instant yeast
- 1 1/2 tsp salt
- 1 tbsp sugar
- 1 1/2 cups warm water (about 110°F/43°C)
- 2 tbsp olive oil
- 1 tsp apple cider vinegar
- 1 tbsp psyllium husk (optional)
Instructions
- Whisk the dry ingredients together in a bowl.
- Stir the warm water, olive oil, and apple cider vinegar into the dry ingredients until a thick, sticky batter forms.
- Cover and let the mixture rise at room temperature for 60–90 minutes until bubbly.
- Transfer the dough to a floured surface or parchment paper and gently shape it into a loaf.
- Preheat the Dutch oven to 450°F (230°C).
- Bake the loaf covered for 30 minutes, then uncover and bake for another 10–15 minutes until the internal temperature reaches 205–210°F (96–99°C).
- Cool on a rack for at least 1 hour before slicing.
Notes
For best results, use a thermometer to ensure correct baking temperatures and check for doneness.
- Prep Time: 10 minutes
- Cook Time: 50 minutes
- Category: Baked Goods
- Method: Baking
- Cuisine: Gluten-Free
- Diet: Gluten-Free
Nutrition
- Serving Size: 1 slice
- Calories: 150
- Sugar: 1g
- Sodium: 300mg
- Fat: 7g
- Saturated Fat: 1g
- Unsaturated Fat: 6g
- Trans Fat: 0g
- Carbohydrates: 23g
- Fiber: 2g
- Protein: 3g
- Cholesterol: 0mg