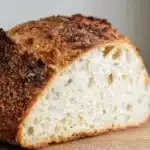
I fell in love with this No Knead Gluten Free Bread the first time I pulled a hot, crackly loaf from my Dutch oven. It delivers a crisp crust and soft crumb without hours of kneading, and I’ve made it dozens of times for weekday sandwiches and weekend toast. If you like a simple, reliable loaf you can mix the night before, this one will become a go-to — similar in convenience to a quick gluten-free loaf I often turn to when time is tight.
Why Make This Recipe
- Hands-off: mix, rest, and bake — no kneading means less time at the counter and fewer mistakes.
- Great texture: a high-hydration dough plus a hot, covered bake gives a crusty exterior and tender interior.
- Versatile and family-friendly: it works for sandwiches, toast, and soups and pairs well with both sweet and savory toppings; I often switch between seeds and herbs depending on the meal.
- Reliable for gluten-free diets: when you use a good flour blend and proper hydration, you get a loaf that holds together and slices well.
- I love this loaf because it’s forgiving — if the dough is wetter than expected, a longer rest and a hot Dutch oven still deliver a beautiful result; try adding savory herbs for an instant flavor lift.
(For a cheesy twist you can also try a related recipe for gluten-free cheese bread.)
Recipe Overview
- Prep time: 15 minutes active + 12–18 hours resting time (room temperature).
- Cook time: 40–50 minutes (covered then uncovered).
- Total time: 13–19 hours (mostly inactive).
- Servings: 8–10 slices (one standard 1.5–2 lb loaf).
- Difficulty: Easy.
- Method: Mix dry and wet ingredients, rest long to hydrate and develop structure, bake hot in a preheated Dutch oven at 450°F (230°C), then finish uncovered for a golden crust — this is similar in timing to a quick no-yeast soda loaf in simplicity, but with the long rest for hydration and strength (no-yeast soda bread).
My Experience Making This Recipe
I tested this loaf with three different gluten-free flour blends and settled on one with a mix of rice flour, tapioca starch, and a little sorghum for flavor. The biggest discovery was that hydration matters: the dough should be sticky and loose before resting. After a few trials I learned that a wet dough and a long rest give the best crumb for slicing.
How to Make No Knead Gluten Free Bread
Start by whisking the dry ingredients (gluten-free flour blend, 1 tsp xanthan gum if your blend lacks it, 1¾ tsp instant yeast, 1 tsp salt) in a large bowl. Stir in warm liquid (about 1½ cups at 100–110°F / 38–43°C), 1 tablespoon oil, and 1 tablespoon honey until you have a very sticky batter. Cover and leave at room temperature for 12–18 hours — the dough should rise and have bubbles. Preheat a 4–6 quart Dutch oven to 450°F (230°C) for at least 30 minutes, scoop the dough onto parchment, bake covered 30–35 minutes, then uncover and bake 10–15 minutes more until deep golden. Rest the loaf 1–2 hours before slicing to set the crumb.
Expert Tips for Success
- Use an oven thermometer and preheat your Dutch oven: a true 450°F (230°C) and a smoking-hot pot are key to crust formation. I use a cast-iron Dutch oven for even heat retention.
- Hydration over firmness: aim for a batter-like, very sticky dough. Gluten-free flours absorb variably; add liquid by tablespoon if dough looks stiff.
- Strengthen structure with xanthan gum or psyllium husk: 1 tsp xanthan or 1–1½ tbsp psyllium husk powder per loaf improves elasticity and sliceability. See how different textures behave in a gluten-free focaccia method for inspiration.
- Measure by weight when possible: 1 cup gluten-free flour blends can range widely; 250–270 g (about 2 cups) is a good starting point for most blends.
- Don’t skip the resting time: the long autolyse-like rest hydrates particles and gives a better crumb — shorter rests give dense loaves.
How to Serve No Knead Gluten Free Bread
- Warm slices with butter and a sprinkle of flaky sea salt for breakfast.
- Use thick slices for grilled sandwiches — the sturdy crumb holds up well to fillings.
- Serve with soups and stews; a rustic torn piece looks great plated.
- For special occasions, slice and toast, then top with whipped ricotta, honey, and fresh herbs for an elegant appetizer.
Storage and Reheating Guide
- Room temperature: store the cooled loaf wrapped in a clean kitchen towel inside a bread box or paper bag for 2 days to preserve crust.
- Refrigerator: avoid long fridge storage — it dries gluten-free bread; if needed, keep in an airtight container for up to 4 days.
- Freezing: slice and wrap individual slices or the whole loaf tightly in plastic wrap and foil, or use a freezer-safe bag; freeze up to 3 months. Thaw at room temperature or in a 350°F (175°C) oven for 10–15 minutes.
- Reheating: refresh a slice in a 350°F (175°C) oven or toaster oven for 6–8 minutes, or microwave briefly (15–20 seconds) on a damp paper towel if you need speed; finishing briefly under a broiler for crust re-crisping works well.
Recipe Variations
- Seeded loaf: fold in 2–3 tablespoons each of sunflower, sesame, and flax seeds into the dough before resting for extra crunch.
- Dairy-free & egg-free: this base is easily dairy-free when using oil; many versions are also egg-free — add 1 tbsp psyllium husk for extra binding.
- Herb and garlic: stir in 1–2 tbsp chopped fresh rosemary or 1 tsp dried herbs plus 1 tsp garlic powder for savory bread.
- Slightly sweet breakfast loaf: fold in 2 tbsp honey and ½ cup dried fruit (raisins or chopped apricot) for a breakfast-style loaf; for a sweeter spin see the apple-cinnamon sweet gluten-free bread for flavor pairing ideas.
Nutritional Highlights
- Carbohydrate-focused: like most breads, this loaf is an energy-rich carbohydrate source; choose whole-grain gluten-free blends for more fiber.
- Lower in additives: making your own controls salt, sugar, and fat levels compared with many store-bought gluten-free breads.
- Allergen note: base recipe is gluten-free and can be dairy- and egg-free depending on your choices; check your flour blend for possible nut or soy cross-contamination if you have allergies. Aim for 1–2 slices per portion depending on appetite and meal balance.
Troubleshooting Common Issues
- Dense, gummy crumb: likely under-hydrated or under-rested. Let the dough rest an extra 6–12 hours and ensure it’s a loose, sticky batter before baking.
- Collapsed loaf: over-proofing at warm temperatures or too much yeast can cause collapse; keep rests at a cool room temp (65–72°F / 18–22°C) or reduce yeast slightly.
- Pale crust: oven not hot enough or no steam. Preheat the Dutch oven well and bake covered to trap steam; finish uncovered to brown.
Frequently Asked Questions
Q1: Can I use a single-source flour (like all rice flour) for this loaf?
A1: Single-source flours often lack balance in protein and starch; they can produce crumbly or dense bread. I recommend a blend with rice flour plus a starch (tapioca or potato) and a bit of a whole-grain flour like sorghum or buckwheat, plus xanthan or psyllium for structure.
Q2: How long should I let the dough rest if my kitchen is warm?
A2: In warm kitchens (above 75°F / 24°C) shorten the rest to 8–12 hours and watch for visible bubbles and a noticeable rise. Cooler kitchens (around 65°F / 18°C) benefit from 12–18 hours. The visual cues—bubbling and a soft, aerated surface—matter more than an exact time.
Q3: Do I have to use a Dutch oven?
A3: A covered Dutch oven gives the best crust because it traps steam; if you don’t have one, use a heavy oven-safe pot with a lid or place a shallow pan of boiling water on the rack beneath the loaf to add steam. A baking stone with a steam tray also works.
Q4: Can I halve or double the recipe?
A4: Yes. Halving works fine for a smaller 2–3 cup batch—reduce bake time slightly and use a smaller covered pot. Doubling requires a larger pot or two pots; avoid crowding as the loaf needs space to expand and hot walls for crust development.
Conclusion
If you want another perspective on gluten-free no-knead techniques, check out this alternate take: Gluten-Free No Knead Bread – Laura Ligos Nutrition. It’s a useful companion for comparing methods and ingredient choices.
Print
No Knead Gluten Free Bread
A simple and reliable no-knead gluten-free bread with a crisp crust and soft crumb, perfect for sandwiches, toast, and more.
- Total Time: 13 hours
- Yield: 8-10 slices 1x
Ingredients
- 2 cups gluten-free flour blend (250-270g)
- 1 tsp xanthan gum (if needed)
- 1¾ tsp instant yeast
- 1 tsp salt
- 1½ cups warm water (100–110°F / 38–43°C)
- 1 tbsp oil
- 1 tbsp honey
Instructions
- In a large bowl, whisk together gluten-free flour blend, xanthan gum, yeast, and salt.
- Stir in warm water, oil, and honey until you have a very sticky batter.
- Cover the bowl and let the dough rise at room temperature for 12–18 hours.
- Preheat a 4–6 quart Dutch oven to 450°F (230°C) for at least 30 minutes.
- Scoop the dough onto parchment paper and carefully place it in the preheated Dutch oven.
- Bake covered for 30–35 minutes, then uncover and bake for an additional 10–15 minutes until deep golden.
- Allow the loaf to rest for 1–2 hours before slicing.
Notes
Use a hot Dutch oven for a perfect crust. Hydration is key; aim for a sticky dough.
- Prep Time: 15 minutes
- Cook Time: 50 minutes
- Category: Bread
- Method: Baking
- Cuisine: Gluten-Free
- Diet: Gluten-Free
Nutrition
- Serving Size: 1 slice
- Calories: 180
- Sugar: 3g
- Sodium: 300mg
- Fat: 5g
- Saturated Fat: 1g
- Unsaturated Fat: 4g
- Trans Fat: 0g
- Carbohydrates: 33g
- Fiber: 2g
- Protein: 4g
- Cholesterol: 0mg